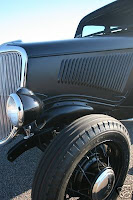
1934 Fords are just cool! Thats all there is to it.
Now we have the doors that open and shut, and they actually line up and the hinges work like they should, the devil is always in the details. The ford doors have an their idiocyncracies, even when they were new. A big visual problem is when you close the door, the forward edge of the door at the belt line seems not to curve enough to sit flush with the cowl. No amount of twisting or turning will correct this problem. After I come across issues like this I generally like to let it sit for a few days while I think about it. I don't consiously think about it, but its in the back of my mind, and the solution often just occurs to me in time. The answer I came up with was to cut a vertical slot in the shape of an "eye" which allowed me to push the door belt line inboard. After I adjusted it so that it was flush, it was a simple matter of welding the cut back shut.

You can see here the end result in the photo at the left. Another point I like to bring up is the difference between the 1934 and the 1933 Fords. The 1934 Ford has the vertical web in the window opening of the door. The 1933 didn't come with the vent window option. The way it worked in 1934 is that the window actually traveled towards the back of the car before going down which gives you a vent window. What this means is that the window risers are different between the years, as well as the shape of the glass.
The next part was the mess that looked like the roof. The problem was that the car had been sitting outdoors in the woods for over 30 years. The metal had been reduced to that "corn bread" look that was really thin and extremely hard to weld. My solution to this was to weld in a filler panel over where the original hole was, but add an additional layer of steel. The crown along the back edge of the roof has a very distictive shape, and the 1940 Ford sedan happens to have this shape if you turn it around backwards and weld it on the roof. I just happened to have not one but two 1940 Ford sedans that I had salvaged for parts.
Here is the finshed product. I welded on to the roof section, and the heated the metal beside the weld one inch at a time. With a dolly supporting the roof from underneath, it was possible to bump the weld seam so that it was actually lower that the roof surface. This minimizes the filler needed to smooth it out, and makes a better finished product.

 Now that the body had been sealed and primed, the next step was to set it on the frame for mockup and start dealing with the issues related to making everything work in harmony. What I did was set the chassis on jack stands and tried to approximate ride height with the 750 16 bias tires on the rear and 500 15 bias on the front. I had the rear wheels, which were original 1940 ford wheel widened from 4.5 inches to 8 inches which gave the 750 16 just the right look.


 More on the final steps to get the body ready for its long process at the paint shop.


 But where do you start? What needs to be done first? As with any project its really just a series of small projects done one after another. If you look at it in that way, it keeps you focused and help prevent the feeling of being overwhelmed with the project. First thing I did was to take inventory of what I had, and what I needed. The frame was garbage, as where the doors and decklid. The tops of the quarter panels was usable, and the roof could be salvaged.


